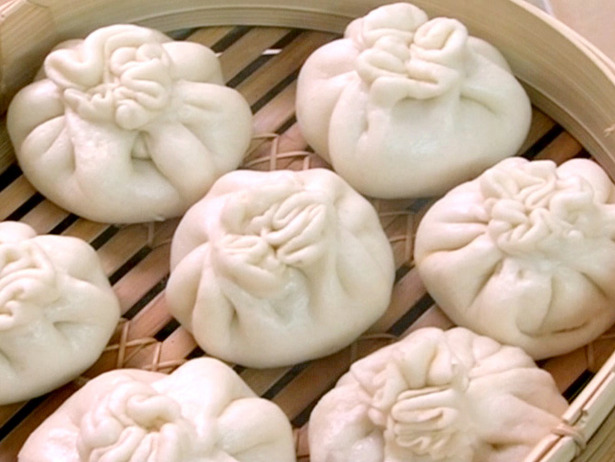
Chinese Steamed Chicken Buns ~Bread Machine

484970_10200654292499569_1358034528_n

When I was in Jr. High School my mom worked with a gal Keng, from Singapore.  Occasionally Keng would bring in food that she had prepared.  Sometimes it was noodles and once in a while it was these deliciously savory, fragrant and chewy steamed buns.  They were like nothing I had ever tried at any Chinese restaurant.

I was recollecting Keng and her amazing steamed buns and decided to make them.  I had just bought an industrial size pack of boneless, skinless chicken breast and was tired of oven fried chicken, I needed something more complex and savory. Sadly, I cannot honestly recall what the meat was in Keng’s buns.  I believe it was ground pork.  That would be amazing too.

I found a recipe or two online and one in my bread machine cookbook and combined them all to create my own recipe.  My girls and husband were crazy about them and The Mr. promptly said “You can make these anytime you want!”  I laughed and assured him, it was going to be a while before I did these again.  Not because I did not enjoy them, but they are a lengthy project to undertake.  But, yes… they are mighty tasty!

Dough Ingredients:

5/8 cup lukewarm milk

2 cups unbleached white flour

1/2 teaspoon salt

1/2 teaspoon granulated sugar

1 tablespoon room temp butter

1 teaspoon rapid rise yeast

Pour the milk into the bread machine and add the butter.  Sprinkle the flour to cover the milk.  Add the salt and sugar into separate corners and put the yeast directly in the center.  Use your dough cycle on your machine.  Allow the dough to rest after the cycle ends.  I allowed mine to hang out for about three hours after the cycle ended.

Filling Ingredients:

2 tablespoons sunflower oil

2 inch piece of ginger root finely minced

2 tablespoons soy sauce

1 tablespoon honey

1/8 teaspoon Chinese five spice powder (*this seems like a small amount but the flavor is needed)

8 ounces chicken breast, thinly sliced and cut into 1″ pieces

3 scallions chopped

1 tablespoon cilantro chopped

Salt and pepper

Mix all of the ingredients and marinate for at least 1/2 hour.  Heat a non stick skillet and add 1 tablespoon of oil.  When the skillet is hot add 1/2 of the chicken and stir fry for approximately 3 minutes. Remove from skillet and add the second batch of chicken.  Cook for 3 minutes and add the the first batch.  Let rest for 1/2 hour to cool the ingredients.

Vegetables For Filling:

1 small can sliced water chestnuts ~ Drained

2 carrots peeled and roughly chopped

1 small onion roughly chopped

2 cloves garlic roughly chopped

Add all the ingredients into a food processor and pulse until the vegetables are well chopped.  Add the chopped vegetables to the chicken, once the chicken is cooled and easy to handle.

Dough Preparation:

Sprinkle your work surface with flour and roll the dough into a log shape.  Cut the dough into eight uniform segments and cover with a tea towel.

Take the first piece of dough and roll it into a 5″ round.  Recover and roll out the remaining dough balls into 5″ rounds, covering the dough as you work to keep it from drying out.

Heat approximately 6″ of water in a large stockpot and place your bamboo steamer on the pan.  Heat the water to a boil.

Take one round of dough and add about 2 tablespoons of filling and pull the dough out a bit.  Run a small amount of water around the edge of the dough.  Bring the sides of the dough to cover the filling and pinch the edges together to seal.  Place the bun on a small square of wax paper or parchment.  This is used to keep it from sticking in the steamer.

Cover the completed bun with a tea towel as you create the remaining seven.

Load the buns into the steamer, being careful not to allow them to touch the sides of the steamer or each other.  Keep in mind that the buns will expand as they cook.  It’s quite surprising how much larger they get while steaming.

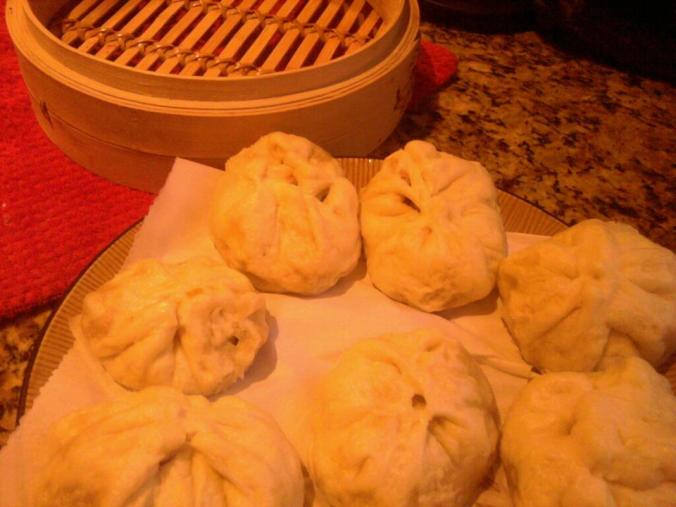
steamed bun

Steam the buns for ten minutes and serve immediately.
Thai Chicken Satay with Peanut Sauce and Thai Cucumber Salad

I am crazy about Thai food!  I love the blend of sweet, salty and spicy that they are so well known for.

One of my favorite things to order when we go out for Thai, is chicken satay with peanut sauce and cucumber salad.

When we moved to the remote mountains of Maine we lost all possible hope to get Thai take out and I set out to find a great recipe to make my own satay.

Thai Chicken Satay

Prep:

Soak wooden skewers first

Ingredients:

3 boneless skinless chicken breasts / butterflied and pounded thin (scaloppini style)

Marinade:

Grated zest of 1 lemon ~ I find using a microplane works well or 1/4 cup lemongrass

3 cloves garlic minced

1 small onion sliced

1 tsp. Thai chili sauce or Thai chili garlic sauce (see photo below)

1 thumb sized piece of ginger sliced thin

1/2 tsp. dried turmeric

5 tbsp. brown sugar

2 tbsp. vegetable oil

3 tbsp. soy sauce

2 tbsp. ground coriander

2 tsp cumin

Put all of the marinade ingredients into a food processor and process till smooth.  I took a taste of this marinade and it is absolutely divine on it’s own, so I imagine it would be good over plain grilled chicken or if you want to make satay, put your uncooked chicken into the marinade for at least 6 hours or up to 24 hours to develop the flavor. Thread uncooked marinated chicken on skewers before cooking.


Grill your chicken about 1 minute per side and it will be quite tender. Cover lightly till ready to serve.

Serve with Thai peanut sauce, a fresh Thai cucumber salad and steamed jasmine rice.

Thai Peanut Sauce

1 – 10 oz. can coconut milk

1/2 cup crunch peanut butter (I only use natural unsweetened)

1 tablespoon dark soy sauce

2 teaspoons brown sugar

1 teaspoon red pepper flakes

1/2 small onion finely chopped

Combine all ingredients over low heat till the milk and peanut butter have melted together well.  This can be made days in advance and reheated.

Thai Cucumber Salad

Incredients:

Ingredients

  • 1/4 cup minced shallot
  • 1/4 cup sliced green onions
  • 2 medium cucumbers  peeled, halved lengthwise, seeded, and thinly sliced
  • 1/2 to 1 teaspoon red chili flakes
  • 1 carrot peeled and julienned into 1/2″ slices
  • 1/4 cup rice vinegar
  • 1 tablespoons sugar
  • 1/4 teaspoon salt
  • 1/8 cup chopped fresh cilantro
  • Mix all of the ingredients and let marinate at least 1 hour before serving with satay.

Gorgeous Hot and Sour Soup

Hot and Sour Soup

One of the dishes I crave the most is a good hot and sour soup.  For some reason I thought it would be too difficult to make.  So wrong!

That is not to say that it’s not time consuming.  It kind of is.  However, so worth every bit of chopping and prep.  Once it’s done, it’s a breeze.

Hot and Sour soup is healthy, low calorie and great if you have a cold.  It’s filled with great fungi, tofu and lean meat.  What’s not to love about that?

After perusing the internet and finding a few recipes I put a few together and made my own with the ingredients I most love in the soups that I’ve had over the years.  Since we live in a pretty rural area and do not have a decent Asian market sadly, finding the mushrooms that most of the recipes require was impossible.  So I opted to just use the fresh that I did have at my local grocery store.  For authenticity I’ve included in the ones that I see in most recipes and have given instructions as to how to prepare it… that being said, I found that following the general directions for the broth and using fresh mushrooms was just as tasty.

I even went so far as to fry up a batch of crab rangoon (recipe to follow later) and made some extra fried wonton strips to top the soup off with.  Yes, it was a good night at our house! I’m pretty sure I ate myself silly that night, between my favorite soup and those cheesy, crab pockets of love!

Ingredients

  • 1 ounce dried wood ear mushrooms
  • 4 dried shiitake mushrooms
  • 12 dried tiger lily buds
  • 1 lb. pork tenderloin – sliced into thin strips
  • 1 sm. can bamboo shoots- sliced into thin strips
  • 2 cups hot water (omit if using fresh mushrooms)
  • 1/3 ounce bamboo fungus
  • 3 tablespoons soy sauce
  • 5 tablespoons rice vinegar
  • 1/4 cup cornstarch (reduce to 1 tablespoon if using fresh mushrooms and not dried)
  • 1 (8 ounce) container firm tofu, cut into 1/4 inch cubes
  • 1 quart vegetable broth (I’ve used chicken broth too, it will come out more of a creamy golden color instead of light brown)
  • 1/4 teaspoon crushed red pepper flakes
  • 1/2 teaspoon ground black pepper
  • 3/4 teaspoon ground white pepper
  • 2 eggs lightly beaten
  • 1/2 tablespoon chili oil (extra if you like your soup HOT, HOT)
  • 1/2 tablespoon sesame oil
  • 1 green onion, sliced

Directions

  1. In a small bowl, place wood mushrooms, shiitake mushrooms, and lily buds in 1 1/2 cups hot water. Soak 20 minutes, until re-hydrated. Drain, reserving liquid. Trim stems from the mushrooms, and cut into thin strips. Cut the lily buds in half.
  2. In a separate small bowl, soak bamboo fungus in 1/4 cup lightly salted hot water. Soak about 20 minutes, until re-hydrated. Drain, and mince. Or if these are unavailable to you, try to find some exotic mushrooms at your grocer.  I used shiitake and some other Asian mushrooms (fresh) and they tasted lovely.  Remember when using mushrooms how much they shrink after cooking.  Buy extra, you won’t regret it!
  3. In a third small bowl, blend soy sauce, rice vinegar, and 1 tablespoon cornstarch.
  4. In a medium saucepan, mix the reserved mushroom and lily bud liquid with the vegetable broth. Bring to a boil, and stir in the wood mushrooms, shiitake mushrooms,  lily buds and bamboo shoots. Reduce heat, and simmer 3 to 5 minutes. Season with red pepper, black pepper, and white pepper.
  5. In a small bowl, mix remaining cornstarch and remaining water (again, this is only used if you have used dried mushrooms and not fresh). Stir into the broth mixture until thickened.  Add more cornstarch blended with water if you want your soup to be thicker.
  6. Mix soy sauce mixture and  tofu cubes into the saucepan. Return to boil, and stir in the bamboo fungus, add pork and cook for 3-4 minutes, until the broth comes to a boil again.   Add chili oil, and sesame oil.  Just before serving, turn off the heat. Stir the egg in gradually.  Garnish with green onion to serve.

Follow us on TWITTER @ Octavia’s Vintage

Check Out Our Ebay Auctions octaviasvintage

Or On ETSY.com ~ Octavias  For Some Extra Rad Goods!!

Wicked Good !!! Szechuan Orange Chicken with Red Chilies

Spicy! Szechuan Orange Chicken with Red Chilies

As I’ve mentioned before, I have a strong love for spicy, Asian food.  And while I love nothing more than picking up the phone, hitting speed dial to our local China Spring restaurant, if I did this as often as I craved Chinese food, I’d have to have a second job to foot the bill!

Last night I set out to make a chicken stir-fry, of some sorts, and to try and cook those now frozen crab rangoons that I crafted and wrangled with the previous night.  No, tonight I’d win, gosh darn-it!

I had all of the veggies all ready to prep.  Then it dawned on me!  How hard would it really be to make a spicy orange chicken?

Stir-fry’s…while I do love them, sometimes they can be rather flat tasting when homemade.  Okay, perchance it got late in the day and I did not want to get into finding some stellar recipe for a chicken stir fry that did not taste like every homemade stir fry, I’ve ever made.  Bland.  Flat.  Uninteresting.

Maybe it’s because we don’t add MSG?  Maybe it’s because I’m nothing close to Asian, but am in fact certifiably, 100% Celtic blood. Born and raised on bland o’ food!  How can I possibly make something close to my local Asian take-out?  I’m still just an Irish gal, after all!

I was determined to make orange chicken instead,  Spicy,  Szechuan goodness!  In truth, not as healthy as stir fry…especially with said crab rangoons added.  Yeah, it’s pretty much a diet disaster really!  That being said, this recipe could very easily translate into a healthy version by simply omitting the flour and frying part of it and by simply stir-frying.  ; )

I decided to look for a few good recipes, as I so often do, to find the perfect combination of ingredients that I (thankfully) had on hand to make a good, spicy, Szechuan chicken for dinner.  My three key ingredients I knew I had were boneless chicken thighs, oranges and fresh broccoli.  I was good to go!

First in order… Timing is everything and is usually one of the most difficult things for any new chef to master.  I like to make my dinners as easy and seamless as possible and I like to have everything come out together at once.  It took years to  figure that out.

By the by…

I also am a fan of keeping my kitchen clean as I go. There is generally time in between things to wash a pan or two.  It’s much nicer to have your work space clean and organized.

Don’t get me going on folks who make a HUGE mess as they cook!   Who wants that at the end of a thoughtfully prepared dinner?  Not me!

I digress…

Here’s your timing thing~

Get the rice into the steamer and get it going!  Okay, there is 40 minutes at the very least.  If you’re cooking on the stove, you got to watch it to be sure it does not boil over or burn.  Again, my reason for owning my rice cooker (*see note below).

Next, get the boneless chicken thighs out so they are not super cold.  It’s okay as long as your not leaving them out for hours in a warm room.  They are going to have to get hot anyway while cooking.  Help them out a little.  Unless you have a second cutting board, wait to cut the chicken until you’ve prepared your veggies.  You don’t want cross contamination.

Chop broccoli and red peppers.  Broccoli into sizable chunks and red peppers, diced.  Okay, Good!

Now, to make the orange sauce.  It’s easy!

Serves: 4-5

Ingredients:

  • Sauce:
  • 1 1/2 cups water
  • 2 tablespoons orange juice
  • 1/4 cup lemon juice
  • 1/3 cup rice vinegar
  • 2 1/2 tablespoons soy sauce
  • 1 tablespoon grated orange zest
  • 1 cup packed brown sugar
  • 1/2 teaspoon minced fresh ginger root
  • 1/2 teaspoon minced garlic
  • 2 tablespoons chopped green onion
  • 1/2 teaspoon red pepper flakes
  • 3 tablespoons cornstarch
  • 2 tablespoons water

With your orange sauce ready to go, it’s time to delve into cutting your chicken.

Chicken:

  • 1 lb. boneless chicken thighs, cut into 1/2 inch cubes (keep these separate from the flour blend, till you’re ready to cook)
  • 1 cup all-purpose flour
  • 1/4 teaspoon salt
  • 1/4 teaspoon pepper

Directions:

  1. Pour 1 1/2 cups water, orange juice, lemon juice, rice vinegar, and soy sauce into a saucepan and set over medium-high heat. Stir in the orange zest, brown sugar, ginger, garlic, chopped onion, and red pepper flakes. Bring to a boil. Remove from heat, and cool 10 to 15 minutes.
  2. Take chicken thigh cubes and place in zip-lock bag with flour, s & p and shake till chicken is well coated.  It might be wise to do this in smaller batches, with about 1/4 of your cubed chicken, so as not to muck up the flour with chicken bits!
  3. Heat  1.5″ vegetable oil in fry pan on medium heat.  Not too hot!!
  4. Shake off chicken cubes and place in oil.  Cook approx. 4 minutes and flip over.  Make sure they are nice and brown.
  5. Place cooked on toweling to absorb oil.
  6. Start next batch of chicken.  Do not rush and hence overcrowd pan, or you’ll end up with soggy, oily chicken.

Note: Carefully discard your oil from cooking your chicken.  This should be done in a separate container (please don’t wash it down the sink or you’ll surely regret it later!)

Wipe or clean out the skillet, and add the sauce. Bring to a boil over medium-high heat. Mix together the cornstarch and 2 tablespoons cool water (no lumps please); stir into the sauce. Reduce heat to medium low, add the chicken pieces, and simmer, about 5 minutes, stirring occasionally.

Serve with fresh lightly steamed broccoli and some brown or jasmine rice.

Enjoy friends!

Note: Oh, how I wish I had a deep fryer sometimes, even though I’d consider myself health conscientious! But I just cannot bring myself to getting one, for fear of frying everything from Snickers bars to cheeseburgers!  So I refrain (for now) in buying one of those evol kitchen products.  Ha!!

However: As mentioned before, one of the BEST kitchen products we own is our rice/ veggie steamer from Black and Decker.  We’re on our 2nd one because we use it so much, we killed the first one!  It’s an invaluable piece of equipment to own.  Rice comes out perfectly every time and potatoes and veggies~ Divine.  Microwaving is so bad for you and your lovely little veggies.  Truly it is!

Here is a good article on the dangers of microwaving!  F.Y.I. Our friends tried this and they got the same results.

http://www.eutimes.net/2011/03/experiment-microwaved-water-kills-plants/

Crab Rangoon~ Easy, Quick and Sooo Delicious!

Beyond my affinity for a great hot and sour soup, I have to say… I adore, I mean ADORE crab rangoon.  We have lived in a lot of different cities over the years and I’ve had a lot of the various crab rangoon offerings at our local Chinese restaurants and while I’m positive that these little packages of cheesy love are not anything close to something you would find in Asia, I still adore them.  I have to say, after having probably too many of them over the years at our local Jade Gardens,  Panda Garden, China Spring, Great Wall, Panda Express or whatever… I can say there are some that have been awesome and some that have been total rangoon doggies.  Too cheesy, too fishy… you name it.

I decided along with my hot and sour soup night a couple of weeks ago to give it a go.  I figured really, what could they possibly have to work with (with the exception of a handy deep fryer!) that I don’t have here? So I searched the internet for various recipes and found that everyone had their rendition of the rangoon.  I have to say, while I of all people can appreciate a good addition of spices and herbs, I am fond of the basic, cheesy, somewhat sweet with a touch of green onion in my rangoon.  Nothing fancy, nothing overly special.

So here is what I have figured out…

1.  Once you make them, cook them.  DON’T wait to cook them.   Do it immediately!  I tried making them ahead of time tonight and it was an EPIC FAIL!  Mostly due to the fact that they got too warm ahead of time and pretty much exploded in the hot oil.  Considering my first attempt at making them worked out beautifully and I did nothing different this time, except for allowing them to sit in a warmer environment prior to cooking, that is all I can determine that was different from the first time.

Now that being said, I wonder (though I cannot vouch for this hypothesis) as to whether they can be made ahead of time and refrigerated to a cold temp and then cooked off later.  Honestly, I think my downfall was the wonton wrappers getting too soft and warm and therefore breaking down upon hitting the hot oil.  I know the Chinese restaurants are not making these to order, but as I said… it’s a new recipe.  So give it a whirl!

2.  Use a thermometer for your oil.  Keep it at a consistent 350 and watch it as it will fluctuate a lot as you add and remove the rangoons.
3.  Be careful to make sure that your rangoons are well sealed.  Otherwise, they will leak and make a huge mess in your pot.  Yuck!
So here goes… Like I said, it’s basic and reminds me of the rangoon I’ve had that tasted the best over my years of traveling.

Yield: Approx. 38 Rangoons

Ingredients:

2 Blocks of cream cheese room temp
2 cans of crabmeat
4 teaspoons sugar
5 green onions diced
1 egg beaten (in bowl)
Wonton wrappers / One package will do fine
Vegetable oil

Instructions:
Blend your  first four ingredients well, until you end up with a nice fluffy mixture.

Heat  3″ of  vegetable oil until it reaches 350 degrees.  I use a small saucepan pot.   Nothing too large.

Take your wonton wrappers and place about 1 heaping teaspoon of crab mixture in the center.  Take your finger and run a small amount of egg on two sides of the wonton wrapper (this is your glue).  Fold your wonton over making a triangle shape.  Make sure that your edges are well sealed.


Make up about four at a time, or if you have a helper that is nice.  That way you can have someone making the rangoon while you cook the rangoon.  I cooked only two – three at a time (yes, that few, you don’t want to crowd the pan) and flipped them when they got nice and golden brown.  It really does not take a long time to cook them but overall, yes… it’s time consuming to make a bunch.  Again, make sure your oil stays at a consistent temp or you’ll end up with a messy vat o’ oil!  The bigger issue comes with keeping everyone out of the rangoon as they are finished.  The good part is the oil is so incredibly hot that they will burn they freaking mouths off if they eat them before they cool down!  : )

Of course you’ll want to cool them on some toweling to absorb some of the oil.

Serve with your favorite dipping sauce, duck, hot and spicy mustard, chili dipping sauce or whatever strikes you.

Absolutely, delicious!

Slainte,
Cilla
Octavia’s Vintage

Follow us on TWITTER @ Octavia’s Vintage

Check Out Our Ebay Auctions octaviasvintage

Or On ETSY.com ~ Octavias  For Some Extra Rad Goods!!